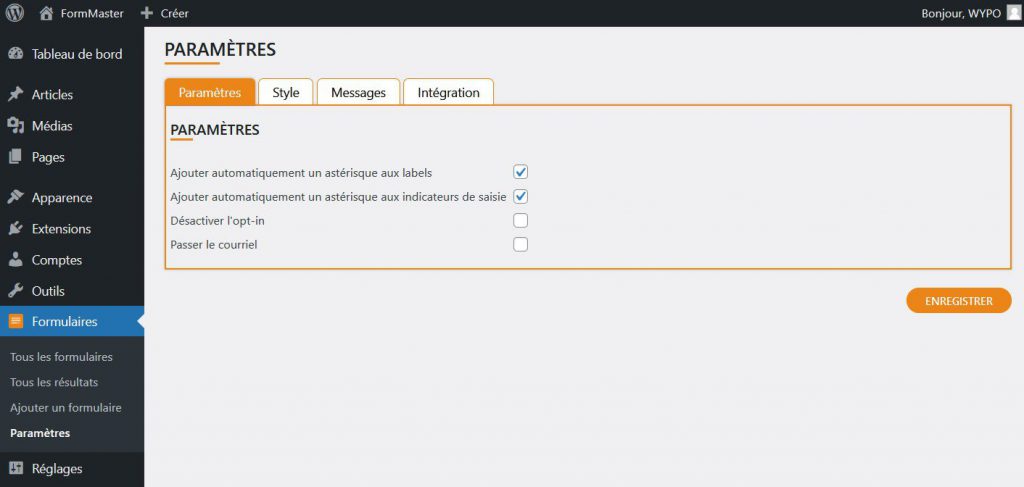
Parameters
FormMaster’s Settings tab lets you configure important options for the behavior of your forms. Here’s an overview of the different fields available in this tab:
Automatically add an asterisk to labels
Check this box to automatically add an asterisk (*) to all form field labels. This gives a visual indication that the field is required.
Automatically add an asterisk to input flags
Check this box to automatically add an asterisk (*) to the placeholders of form fields. This helps signal to users that these fields are mandatory.
Disable opt-in
Check this box to disable the default opt-in option. This prevents an opt-in checkbox from being automatically added to your forms.
Skip e-mail
Check this box if you do not wish to receive email notifications when submitting a form. Use this option if you don’t want to receive e-mail notifications every time you submit a form.
These parameters can also be modified individually for each form.
Style
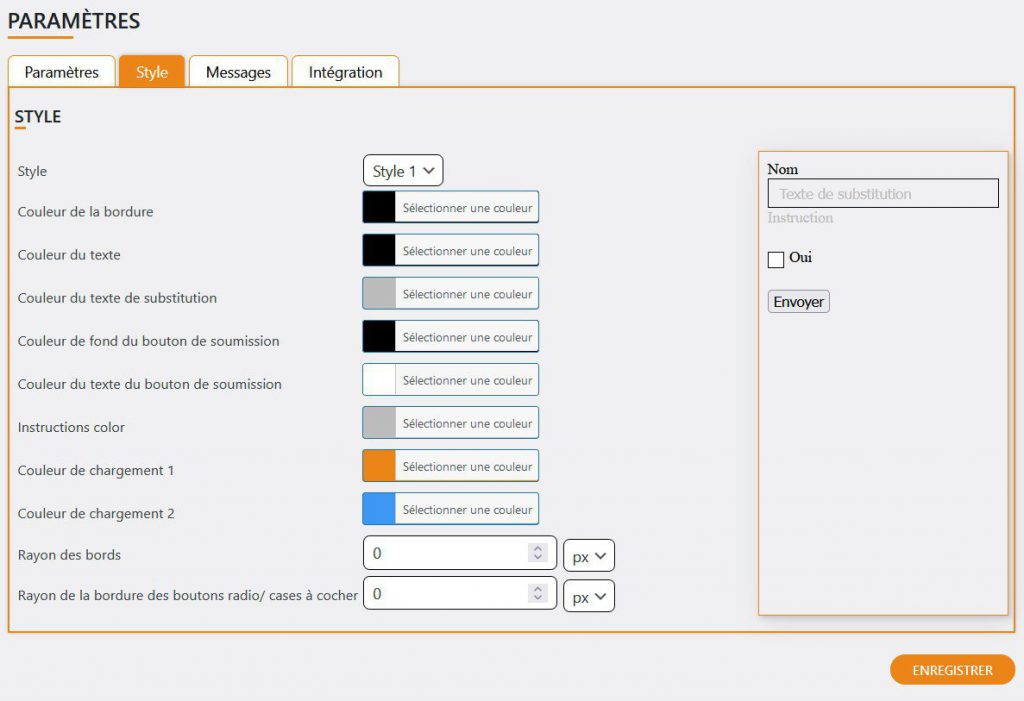
FormMaster’s Style tab lets you manage the appearance of your forms without having to write code. You can customize colors, borders and other visual aspects of the form through a user-friendly interface. A preview on the right lets you see the changes you’ve made in real time.
“Style” drop-down menu
Use this menu to select a global style for your form. Predefined styles let you quickly change the appearance of your form.
Color fields
- Border color: Select the color of the form field border.
- Text color: Select the color of the text inside form fields.
- Placeholder text color: Set the color of the placeholder text in form fields.
- Submit button background color: Select the background color for the form’s submit button.
- Submit button text color: Select the text color for the submit button.
- Instruction color: Set the color of instructions or help messages associated with fields.
- Loading color 1: Select the first color for loading indicators.
- Loading color 2: Select the second color for loading indicators.
Angles modification fields
- Field border radius: Modify field border angles by selecting a number and a unit (e.g. px, em, %).
- Radio button/checkbox border radius: Adjust radio button and checkbox border angles by selecting a number and a unit.
Real-time preview
The preview on the right lets you instantly see the changes you make to the style of your form. This makes adjustments easier, and helps you get the look you want without having to save and reload the form every time you make a change.
Message
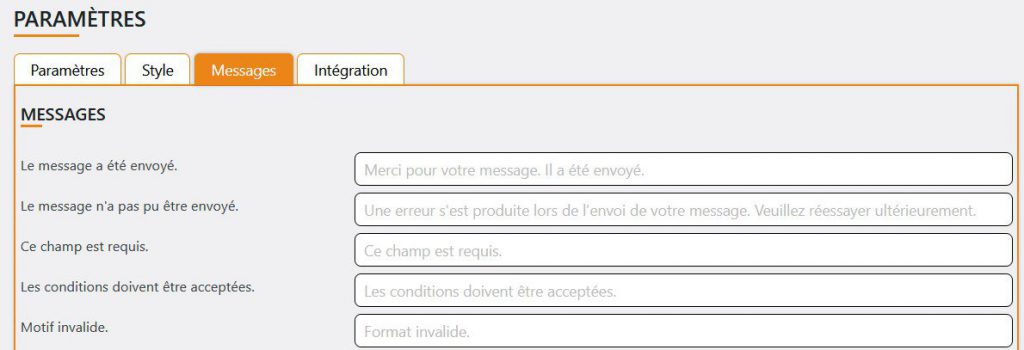
FormMaster’s Message tab allows you to customize the content of error and validation messages. You can adapt messages to match the tone and style of your website.
List of Default Message Fields
Here are the default messages that you can customize:
- Message has been sent: Message displayed when the form has been sent successfully.
- Message could not be sent: Message displayed when the form cannot be sent.
- This field is required: Message displayed when a mandatory field is not filled in.
- Conditions must be accepted: Message displayed when a condition checkbox is not accepted.
- Invalid reason: Message displayed when the input format is invalid.
- Field too short: Message displayed when a field contains too few characters.
- Field too long: Message displayed when a field contains too many characters.
- The field is too small: Message displayed when the value of a field is too small.
- The field is too large: Message displayed when the value of a field is too large.
- The date indicated in this field is too early: Message displayed when the date entered is earlier than the minimum date allowed.
- The date indicated in this field is too late: Message displayed when the date entered is later than the maximum date allowed.
- Upload in this format is not authorized: Message displayed when the uploaded file format is not authorized.
- Downloaded file is too large: Message displayed when the downloaded file exceeds the maximum authorized size.
- Incorrect number of files: Message displayed when the number of files downloaded is incorrect.
- File upload failed due to PHP error: Message displayed when a file download fails due to a PHP error.
- Opt-in text: Message for opt-in option.
- Submit button text: Text displayed on the form’s submit button.
Integration
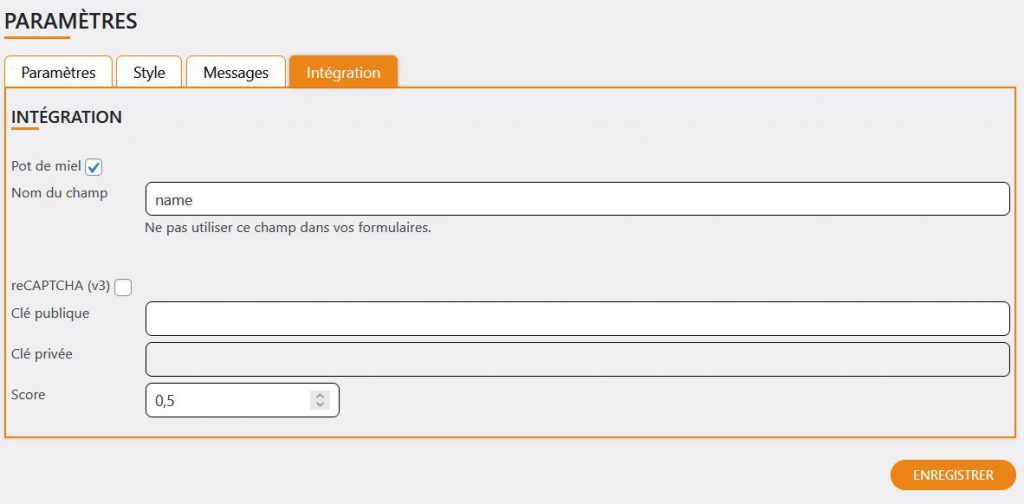
The “Integration” tab lets you add additional security measures to your forms by activating a honeypot and reCaptcha v3.
Honeypot
A honeypot is a simple but effective technique for reducing automated form submissions by robots.
- Enable honeypot: Check this box to enable honeypot on your forms.
- Name” attribute for honeypot field: Set the ‘name’ attribute for the honeypot field. The default value is “name”.
reCaptcha v3
reCaptcha v3 helps detect automated submissions and blocks them before they can compromise your site.
- Enable reCaptcha v3: Check this box to enable reCaptcha v3 on your forms.
- Public key: Enter your reCaptcha v3 public key here.
- Private key: Enter your reCaptcha v3 private key here.
- reCaptcha score: Set the minimum score that reCaptcha must return to consider a submission valid. The default value is 0.5 and must be between 1 and 0.1.